
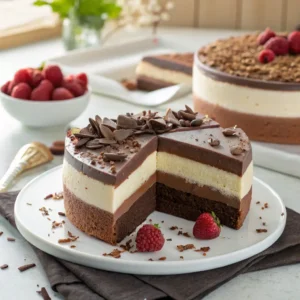
Have you ever craved a dessert that’s so indulgent, it feels like a celebration in every bite? This Triple Chocolate Mousse Cake is exactly that kind of joy—layered with silky chocolate mousse, rich flavor, and melt-in-your-mouth texture that makes it impossible to stop at just one slice.
Whether you’re planning a special occasion or simply treating yourself after a long day, this decadent cake recipe is the perfect choice for chocolate lovers. It’s a no-bake chocolate dessert that looks impressive but is surprisingly approachable—even if you’re not a pastry pro.
I’ve made this cake for birthdays, dinner parties, and quiet weekends in, and every time, it brings out that “wow” reaction. With layers of dark, milk, and white chocolate, it’s a true chocolate lover’s dream—and yes, it tastes as good as it looks.
Ready to create your own slice of happiness? Let’s dive in.
Table of Contents
Why You’ll Love This Recipe
If you’re someone who believes that chocolate is a love language, this Triple Chocolate Mousse Cake will absolutely speak to your soul. It’s the kind of dessert that doesn’t just satisfy a craving—it turns an ordinary moment into something unforgettable.
What makes it so special? It’s all about the layers of rich, silky chocolate mousse—each one bringing its own flavor and texture. From the deep, bold notes of dark chocolate to the creamy smoothness of milk chocolate, and the sweet finish of white chocolate, every bite is balanced, indulgent, and totally joyful.
Here’s why this recipe deserves a spot in your dessert rotation:
- No baking required – It’s a true no-bake chocolate dessert, perfect when you want something elegant without turning on the oven.
- Three decadent layers – Each mousse has its own personality, making every slice a delightful surprise.
- Perfect for any occasion – Whether it’s a birthday, anniversary, or just a Friday night, this cake feels right at home.
- Make-ahead friendly – Chill it overnight, and you’re good to go—ideal for hosting without last-minute stress.
- Crowd-pleasing and photo-worthy – It looks like something from a high-end bakery, but it’s completely doable in your own kitchen.
You don’t need fancy skills—just a little patience and good-quality chocolate. And once you cut that first slice, revealing the perfect trio of mousse layers? That moment alone makes the effort worth it.
This isn’t just a decadent cake recipe—it’s an invitation to treat yourself and the people you love. Ready to create your new favorite dessert?
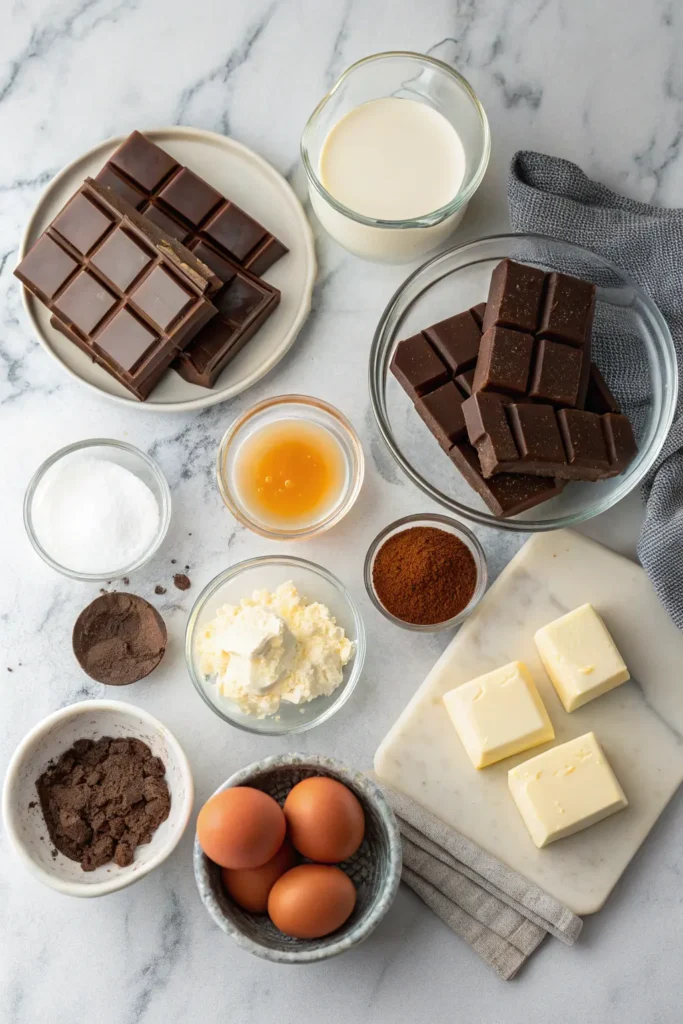
Ingredients to Make This Recipe
Let’s gather everything you’ll need to make this Triple Chocolate Mousse Cake a chocolate lover’s dream. The ingredient list is short and sweet—literally! With just a few high-quality items, you’ll build three luscious layers of chocolate mousse, plus an optional crust that adds a satisfying contrast to the creamy texture.
Each component is straightforward, and you might already have many of these on hand!
For the Chocolate Cookie Crust (Optional but worth it!)
Adds a rich, crunchy base that balances the silky mousse.
- 1 cup chocolate cookie crumbs (e.g., Oreos with filling removed)
- 3 tablespoons unsalted butter, melted
💡 Tip: Press this mixture firmly into the base of your springform pan and chill while you prep the mousse layers.
For the Dark Chocolate Mousse Layer
Deep, rich, and slightly bitter—the perfect base layer.
- 4 oz (115 g) good-quality dark chocolate (around 70% cocoa)
- ¾ cup heavy cream
- 1 teaspoon unflavored gelatin
- 1 tablespoon cold water (to bloom the gelatin)
For the Milk Chocolate Mousse Layer
Creamy and comforting with a sweet cocoa finish.
- 4 oz (115 g) milk chocolate
- ¾ cup heavy cream
- 1 teaspoon unflavored gelatin
- 1 tablespoon cold water
For the White Chocolate Mousse Layer
Sweet, smooth, and the lightest of all three layers.
- 4 oz (115 g) white chocolate
- ¾ cup heavy cream
- 1 teaspoon unflavored gelatin
- 1 tablespoon cold water
Note: White chocolate is delicate—melt it gently and stir constantly to avoid burning.
Optional Toppings & Garnishes
Elevate your presentation and flavor with any of these:
- Chocolate curls or shavings
- Cocoa powder for dusting
- Whipped cream swirls
- Fresh berries like raspberries or strawberries
- A drizzle of chocolate ganache
Final Ingredient Notes:
- Use real chocolate bars, not chips—this ensures smoother melting and better taste.
- Choose full-fat heavy cream for the richest mousse texture.
- If you’re vegetarian, you can swap gelatin with agar-agar—just adjust quantities based on brand.
How to Make This Recipe
Let’s bring your Triple Chocolate Mousse Cake to life—step by step. Don’t be intimidated by the layers; once you master the rhythm, it’s actually a relaxing and rewarding process. Each mousse builds on the last, creating a gorgeous, velvety dessert that looks as stunning as it tastes.
Here’s how to make this indulgent treat with confidence and ease.
Step 1: Prepare the Pan and Crust (Optional)
- Line the base of a springform pan (6″ or 8″) with parchment paper. Lightly grease the sides or line them with acetate for extra-smooth edges.
- Mix 1 cup of chocolate cookie crumbs with 3 tablespoons of melted butter until the texture resembles wet sand.
- Press the mixture firmly into the bottom of the pan to form a compact, even crust.
- Chill the crust in the fridge while you prepare your first mousse layer.
Pro Tip: Use the bottom of a measuring cup or glass to pack the crust firmly—it helps prevent crumbling when slicing later.
Step 2: Make the Dark Chocolate Mousse
- Bloom the gelatin: Sprinkle 1 tsp gelatin over 1 tbsp cold water. Let it sit for 5 minutes.
- Melt 4 oz dark chocolate in a heatproof bowl over simmering water or in the microwave in short bursts.
- In a small saucepan, heat ¼ cup heavy cream just until warm. Stir in the bloomed gelatin until dissolved.
- Add the gelatin-cream mix to the melted chocolate and stir until smooth and glossy.
- Whip the remaining ½ cup cream until soft peaks form. Gently fold into the chocolate mixture until well combined.
- Pour over the chilled crust and level the surface with a spatula. Chill for 30–45 minutes until set.
Step 3: Repeat for the Milk Chocolate Mousse
Follow the exact same steps using milk chocolate. Allow the dark chocolate layer to firm up completely before adding the milk chocolate mousse. This ensures crisp, defined layers in your final slice.
Tip: Gently spoon the mousse over the previous layer, then spread it evenly to avoid disturbing the base.
Step 4: Finish with the White Chocolate Mousse
Repeat the mousse process again with white chocolate, being extra careful while melting—white chocolate is more sensitive to heat.
Pour over the milk chocolate layer once it’s firm, smooth the top, and chill the cake for at least 4 hours, or preferably overnight.
Step 5: Unmold and Decorate
Once fully set:
- Run a warm knife along the inside of the pan and carefully remove the springform ring.
- Transfer the cake to a serving plate or cake stand.
- Decorate as desired with chocolate shavings, a drizzle of ganache, or fresh berries for a pop of color.
Final Tips for Success
- Always let each mousse layer chill and set before adding the next.
- Use room-temperature chocolate when mixing with gelatin for smooth blending.
- For clean slices, dip your knife in hot water and wipe between cuts.
- Want to save time? You can skip the crust—just pour mousse directly into the pan and layer as usual!
- This stunning layered mousse dessert is not only beautiful—it’s surprisingly forgiving. Whether you’re making it for a birthday, dinner party, or just to treat yourself, this cake will always impress.
Now that you’ve mastered the layers, get ready for the fun part—serving and sharing your masterpiece.
Serving Suggestions
Once your Triple Chocolate Mousse Cake is fully set and ready to shine, it’s time to serve it in style! Whether you’re sharing it at a special gathering or enjoying a quiet treat, the presentation and pairing can take this already stunning dessert to the next level. Here are a few ideas to help you serve this indulgent cake in the best possible way.
Chocolate Ganache Drizzle
Nothing elevates a chocolate dessert like a rich, glossy ganache. For a more decadent touch, make a simple ganache by melting equal parts heavy cream and dark chocolate, then drizzle it over the top.
Fresh Fruit Toppings
To balance the richness of the mousse, top your cake with fresh berries like raspberries, strawberries, or even a few blueberries. The tartness of the fruit complements the creamy sweetness of the mousse beautifully.
Pro Tip: Gently toss your berries in a little sugar before placing them on top to bring out their natural sweetness.
Chocolate Curls or Shavings
For a professional touch, sprinkle chocolate curls or shavings over the top of the cake. You can make these by using a vegetable peeler on a block of chocolate or by shaving the surface of chocolate bars. It adds texture and makes your cake look like it came straight from a bakery.
Whipped Cream Swirls
Adding whipped cream to your cake is a classic move. Whether you pipe it on or simply spoon it around the edges, it adds a fluffy contrast to the dense mousse layers. You can even sprinkle a little cocoa powder or chocolate dust for extra flair.
Crushed Biscuit or Cookie Crust
For a bit of crunch, sprinkle crushed cookies or biscuits on top of the mousse layers. This adds a surprising textural contrast that pairs well with the smoothness of the mousse.
Pair with Coffee or Dessert Wine
If you’re serving this triple chocolate mousse cake at a dinner party, pair it with a rich coffee or a glass of dessert wine like Port or Muscat. The flavors of the wine or coffee complement the chocolate in the mousse, making for a delightful after-dinner experience.
Portioning Tips for Perfect Slices
When slicing your mousse cake, use a hot knife (run it under hot water and wipe it dry) to get those clean, sharp slices. This will showcase the beautiful layers of mousse and make each slice a perfect work of art.
Mini Versions
If you want to get creative or make a more personal treat, consider making mini mousse cakes in individual serving cups. Layer the mousse and crust just as you would for the full cake, and let each person enjoy their own little indulgence.
These serving ideas are just the beginning—feel free to get creative with your own toppings and presentation. Whether you keep it simple with a whipped cream dollop or go all out with chocolate ganache and berries, this cake is sure to impress no matter how you serve it.

Conclusion
Your Triple Chocolate Mousse Cake is now ready to impress—whether it’s for a special occasion or a sweet treat to enjoy on your own. With its rich, velvety layers of dark, milk, and white chocolate, this cake isn’t just a dessert; it’s an experience. The best part? It’s a no-bake chocolate cake, so you can create this decadent masterpiece without turning on the oven.
Each bite of this creamy, smooth mousse transports you into a world of chocolate bliss, and the contrasting textures—from the crunchy crust to the silky layers—make every forkful a delight. Whether you’re marking a special occasion, entertaining guests, or just treating yourself, this dessert is sure to impress every time.
A Few Final Tips for Success:
- Allow each mousse layer to fully set before pouring on the next—this helps maintain clean, defined layers that look as impressive as they taste when sliced.
- Chill time is key—this cake benefits from a few hours in the fridge, so plan ahead and let it rest to allow the flavors to fully develop.
- Keep it simple or jazz it up with toppings like whipped cream, chocolate ganache, or fresh fruit—your choice!
Now that you have the perfect recipe, there’s only one thing left to do: enjoy every bite! This triple chocolate mousse cake is the ultimate treat for any chocolate lover and a surefire way to satisfy your sweet tooth.
triple chocolate mousse cake
Ingredients
For the Chocolate Cookie Crust (Optional but worth it!)
- Adds a rich crunchy base that balances the silky mousse.
- 1 cup chocolate cookie crumbs e.g., Oreos with filling removed
- 3 tablespoons unsalted butter melted
For the Dark Chocolate Mousse Layer
- Deep rich, and slightly bitter—the perfect base layer.
- 4 oz 115 g good-quality dark chocolate (around 70% cocoa)
- ¾ cup heavy cream
- 1 teaspoon unflavored gelatin
- 1 tablespoon cold water to bloom the gelatin
For the Milk Chocolate Mousse Layer
- Creamy and comforting with a sweet cocoa finish.
- 4 oz 115 g milk chocolate
- ¾ cup heavy cream
- 1 teaspoon unflavored gelatin
- 1 tablespoon cold water
For the White Chocolate Mousse Layer
- Sweet smooth, and the lightest of all three layers.
- 4 oz 115 g white chocolate
- ¾ cup heavy cream
- 1 teaspoon unflavored gelatin
- 1 tablespoon cold water
Optional Toppings & Garnishes
- Elevate your presentation and flavor with any of these:
- Chocolate curls or shavings
- Cocoa powder for dusting
- Whipped cream swirls
- Fresh berries like raspberries or strawberries
- A drizzle of chocolate ganache
Instructions
Step 1: Prepare the Pan and Crust (Optional)
- Line the base of a springform pan (6″ or 8″) with parchment paper. Lightly grease the sides or line them with acetate for extra-smooth edges.
- Mix 1 cup of chocolate cookie crumbs with 3 tablespoons of melted butter until the texture resembles wet sand.
- Press the mixture firmly into the bottom of the pan to form a compact, even crust.
- Chill the crust in the fridge while you prepare your first mousse layer.
- Pro Tip: Use the bottom of a measuring cup or glass to pack the crust firmly—it helps prevent crumbling when slicing later.
Step 2: Make the Dark Chocolate Mousse
- Bloom the gelatin: Sprinkle 1 tsp gelatin over 1 tbsp cold water. Let it sit for 5 minutes.
- Melt 4 oz dark chocolate in a heatproof bowl over simmering water or in the microwave in short bursts.
- In a small saucepan, heat ¼ cup heavy cream just until warm. Stir in the bloomed gelatin until dissolved.
- Add the gelatin-cream mix to the melted chocolate and stir until smooth and glossy.
- Whip the remaining ½ cup cream until soft peaks form. Gently fold into the chocolate mixture until well combined.
- Pour over the chilled crust and level the surface with a spatula. Chill for 30–45 minutes until set.
Step 3: Repeat for the Milk Chocolate Mousse
- Follow the exact same steps using milk chocolate. Allow the dark chocolate layer to firm up completely before adding the milk chocolate mousse. This ensures crisp, defined layers in your final slice.
- Tip: Gently spoon the mousse over the previous layer, then spread it evenly to avoid disturbing the base.
Step 4: Finish with the White Chocolate Mousse
- Repeat the mousse process again with white chocolate, being extra careful while melting—white chocolate is more sensitive to heat.
- Pour over the milk chocolate layer once it’s firm, smooth the top, and chill the cake for at least 4 hours, or preferably overnight.
Step 5: Unmold and Decorate
- Once fully set:
- Run a warm knife along the inside of the pan and carefully remove the springform ring.
- Transfer the cake to a serving plate or cake stand.
- Decorate as desired with chocolate shavings, a drizzle of ganache, or fresh berries for a pop of color.
Final Tips for Success
- Always let each mousse layer chill and set before adding the next.
- Use room-temperature chocolate when mixing with gelatin for smooth blending.
- For clean slices, dip your knife in hot water and wipe between cuts.
- Want to save time? You can skip the crust—just pour mousse directly into the pan and layer as usual!
- This stunning layered mousse dessert is not only beautiful—it’s surprisingly forgiving. Whether you’re making it for a birthday, dinner party, or just to treat yourself, this cake will always impress.
Notes
| Nutrient | Amount |
|---|---|
| Calories | 480 kcal |
| Total Fat | 34g |
| Saturated Fat | 20g |
| Carbohydrates | 42g |
| Sugar | 34g |
| Protein | 6g |
| Fiber | 3g |
| Cholesterol | 110mg |
| Sodium | 95mg |
FAQs
Here are some common questions about making and storing your Triple Chocolate Mousse Cake, along with helpful tips to ensure your dessert turns out perfect every time!
1. Can I make this cake ahead of time?
Yes, this chocolate mousse cake is perfect for making ahead of time! In fact, it’s recommended to allow the mousse to set in the fridge for at least 4 hours—overnight is even better. This makes it an excellent choice for preparing the day before a party or special occasion.
2. How should I store leftover mousse cake?
To keep your triple chocolate mousse cake fresh, store it in an airtight container in the fridge. It will stay delicious for up to 3-4 days. If you want to keep it longer, you can freeze individual slices, though the texture of the mousse may change slightly after freezing.
3. Can I substitute the gelatin in this recipe?
If you prefer a vegetarian or vegan alternative, you can use agar-agar in place of gelatin. Make sure to follow the package instructions, as it sets differently than gelatin.
4. What other toppings can I add?
Get creative with toppings! You can add:
Chopped nuts (like pistachios, hazelnuts, or almonds) for a crunchy contrast.
Edible gold leaf for a luxurious touch.
Shaved white, milk, or dark chocolate to intensify the chocolate flavors.
A sprinkle of sea salt to balance the sweetness and highlight the chocolate’s richness.
5. How do I get clean slices when cutting the cake?
To get those beautiful, clean slices:
Dip your knife in hot water and wipe it off before each cut.
Use a serrated knife for an even, smooth slice.
Chill the cake thoroughly before cutting to help it hold its shape.
6. Can I make mini versions of this cake?
Yes! Making mini mousse cakes in individual cups or mini springform pans is a fantastic idea. You can layer the mousse just as you would for the full-size cake, but these individual servings make for an elegant presentation at parties or gatherings.
These FAQs should help you feel more confident as you make your triple chocolate mousse cake. Whether you’re a first-time baker or a seasoned pro, these tips ensure that each slice is as delicious as the last.
D’ont Forget To Check Our Our Top Cake Recipes :